
Whether you already own a brick and mortar company, or you’re just about to start an online business, a website (or a blog) is a MUST-HAVE. It allows you to establish an online presence on a piece of internet prime land that is your very own.
And it doesn’t have to be expensive. Neither is it difficult. It’s actually pretty simple to get things set up on your own – no coding, no website designer needed.
Here in this post, I will show you how to start a blog on a budget of $5/month, and actually make money with it.
If you’re all set, let’s dive right in now!
- Why you really need a blog (or website)
- Why WordPress
- The cost to start a website
- Step 1: buy a domain
- Step 2: subscribe to a hosting provider
- Step 3: connect WordPress to your website
- What next?
This post contains affiliate links. If you make a purchase through those links, I may earn a commission at no extra cost to you. I only recommend the best stuff throughout this website, and am transparent about it. Thank you for your support!
Why you really need a blog (or website)
Your own website is something you simply cannot do without, if you want to make a sustainable online income.
Even if your business is an offline one that caters to a local audience, a website portrays professionalism, and allows your customers to get in touch with you. They can set up appointments, email you, call you, and share your posts with their friends.
Your physical store can be out of sight, but your brand should remain in your customers’ minds. A website can help you achieve this.
If you’re running an online business, say in affiliate marketing, a website is pivotal to your promotional efforts.
Social media and forum platforms are not something we own. There are rules to follow, and restrictions that limit how we can promote our offers. Some do not allow affiliate links. Link to your website, then!
With your own website, you call the shots. There are multiple income streams you can generate with one single website: affiliate offers, display ads, sell your own products, sponsored posts, offer your services, etc.
Customers know exactly where to find you, as your website is a virtual plot of land on the internet. You will get repeat customers, as you build trust with your audience, and establish your brand.
What is a blog, then?
Most people use “blog” and “website” interchangeably. In fact, a blog is a part of your website where you produce content consistently, in topics related to your niche.
It can drive a massive amount of traffic, because you will be able to target whatever keywords you want through your blog posts.
Other parts of a website can include the home page, ‘about’ page, legal pages, store (for e-commerce business), etc.
Why WordPress
A content management system (CMS) is the software on which you build your website. Apart from WordPress, which is what I will be focusing on, other CMS include Squarespace, Wix, Joomla, and so on.
WordPress is the most popular CMS, also what I build all my websites on, because of its many strong advantages over the other systems.
The one huge reason for its popularity is its search engine optimization (SEO) features. These include fast loading speed, optimized mobile usage, robust plugins for almost anything you want to accomplish, and enhanced user experience, among others.
WordPress.org, NOT WordPress.com
WordPress.com is a free hosting platform that gives you a subdomain under their main domain. So your website domain looks like this: yourwebsite.wordpress.com.
It does not look professional, and tends to be harder to rank in search engines.
Moreover, you do not own the website, which also means there are limitations with what you can do on it. I do not recommend WordPress.com at all, even though it is completely free.
WordPress.org is the real WordPress. It is the CMS software that you will build your website on. It does not come with a domain name or hosting service, both of which you would have to purchase separately (I will cover these in the steps below).
A note:
Do note that my #1 recommendation for setting up a website (especially for an affiliate marketing business) is Wealthy Affiliate, which is an all-in-one platform with training (teaches how to get free organic traffic), hosting, website builder, keyword research tool, and lots more.
Check out my review of Wealthy Affiliate if you have not done so.
If, for any reason, Wealthy Affiliate is not for you, then the steps detailed below are really the next best way forward.
How much does it cost to start a website
I’m taking the minimalist approach here. And I can tell you the bare essentials you need to get started are just two things:
– your own domain name
– hosting for your website
Your own domain (www.yourwebsite.com) typically costs $15 to $20 per year. A good place to buy your domain is Namecheap.
Hosting options are varied, and can go from as low as a few dollars a month to $60 and probably beyond.
If you go with my recommendation (HostGator: see my review here), it costs less than $4/month for their intermediate plan (unlimited domains), if you take the 36 months package.
So, there you have it.
Own a website (and blog) on a budget of $5+ per month.
Why HostGator
HostGator is my top choice for beginning bloggers, because it strikes a perfect balance between performance and price.
It provides free SSL certificates (this provides security to your site), 24/7 customer support, unlimited domains on the Baby Plan and above, and has excellent track record and many happy customers.
Read my full review of HostGator here.
Now, we’re almost ready to set up your website. Just one last thing… your niche.
Have you chosen your niche?
Before you actually set up your website, you should have an idea what it will be about.
The area or topic, also called niche, should be something
– you are passionate about, or
– you have some background knowledge in, or
– that has posed an issue or problem in your life that required you to research about.
If you need help in defining your niche, this post may help: choosing a profitable niche.
Once you get that sorted out, now it’s time to actually set up your site. Ready?
Step 1: Buy your own domain
When deciding on a domain, try your best to go for a .com extension, because it gets the best reputation and looks the most professional.
It is also easy for your customers to just type it in to get to your site, as people tend to just pay attention to the front part of the domain name and assume it’s .com at the back. So if your domain is not a .com, you may miss out on some returning traffic.
For your domain name itself, choose something short and brand-able, and not prone to spelling errors. For more tips, check out my complete guide to choosing a domain name.
Domains typically cost $15 to $20 per year, sometimes less.
One of the most popular domain name registrars is NameCheap.
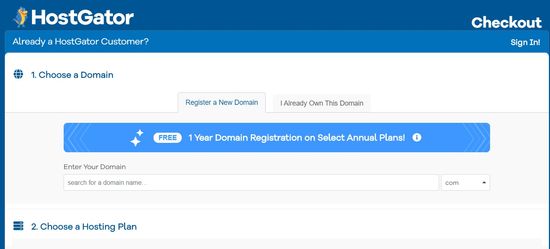
If you go with my recommended hosting provider, HostGator, they provide one free domain name registration for the first year, if you take their annual plans.
Taking both the domain name and hosting with HostGator also means you get to skip the extra step of pointing your domain to the hosting provider.
Registering your domain name with HostGator
On the HostGator website, click on ‘Get started’.
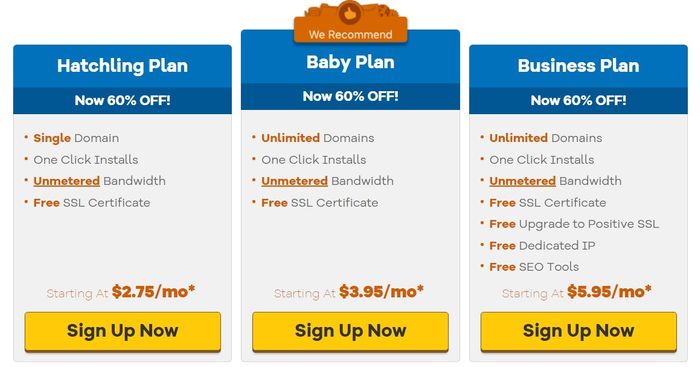
You will get to the page with the three shared web hosting plans (as in the picture below). Click on either the Hatchling Plan or the Baby Plan (don’t worry, you will get to really indicate your final choice on the checkout page, I will explain the plans later).
You will land on this checkout page, where the first step is to choose your domain.
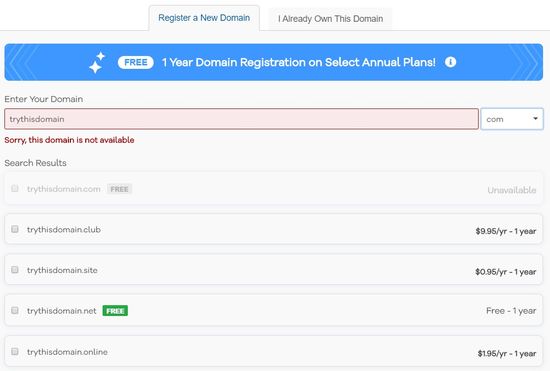
If the domain you choose has been taken, you will not be able to register it.
Once you have chosen your domain name, there is an option for domain privacy protection.
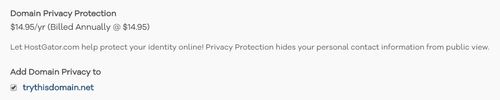
This protects your personal contact information (that you will be using to register for the domain and hosting account) from public eyes.
It costs an additional $1.25 per month, but is entirely up to you whether to include it.
Some people like to be transparent about their identity, but it also means your email address and phone number may be spammed.
Step 2: Subscribe to a hosting provider
Continuing with the HostGator checkout page, this is where you will want to indicate your preferred plan:
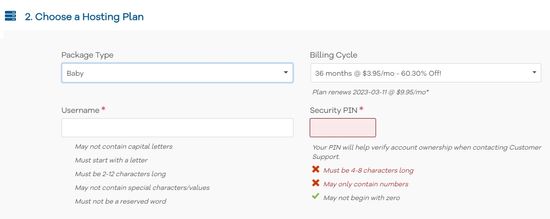
The most popular is the Baby Plan, as it offers unlimited domains.
But if you are just starting out with one website, which in itself will take up quite a bit of your time and energy, then the Hatchling Plan (for just one domain) is sufficient.
You can simply upgrade along the way, whenever you feel ready to take on more.
For the billing cycle, I’d recommend that you choose 36 months, to get the best pricing.
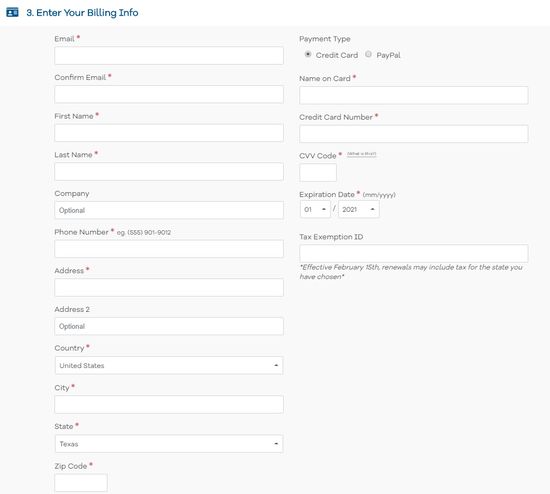
Next, you will enter your billing information.
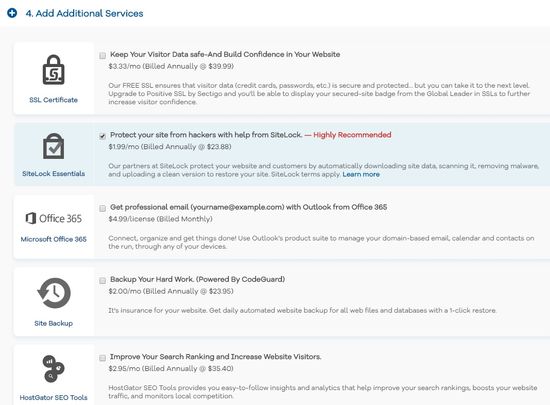
For the Add-ons, you can take your pick. But in my personal opinion, none of them are a real necessity.
Even for SiteLock, I actually do not think you need it. It is highly recommended by HostGator only because they are partners. There are plugins that can do the job for free or at a lower cost.
Complete the checkout process, and you would have created your website!
Step 3: Connect WordPress to your website
Now for the final step: connecting WordPress to your website.
In the welcome email from HostGator, click on the link to the Control Panel (also called cPanel). Once signed in, go to the “Software” section on your dashboard, and click on “QuickInstall”.
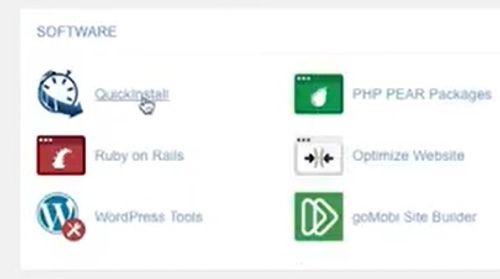
Under the SiteBuilders and CMS section, click on the WordPress icon:
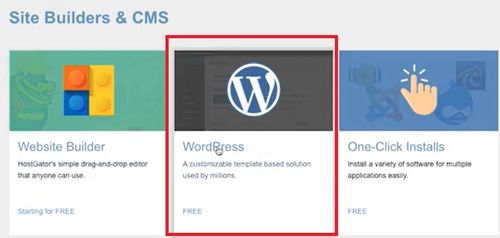
Using the dropdown menu, select the domain that you would like WordPress to be installed on.

Leave the other field on the right blank.
Next, fill in the details on the Install Settings page:
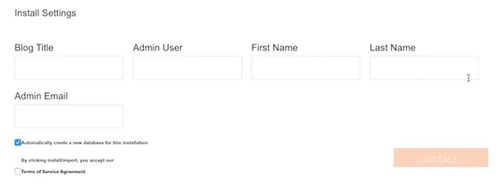
Blog title – this is your website name.
Admin user – user name for the owner of the blog (do not use ‘admin’, as it does not appear professional).
First / Last name – fill these in as well.
Admin email – this should be your main email to which your WordPress password will be sent.
Lastly, check the ‘terms of service agreement’, and click install.
When installation is complete, you will receive your admin URL, user name, and password. Copy and paste these in a safe place so you will not lose them.
It’s done! Now you are a proud website owner!
That wasn’t too bad, was it?
What next?
Next, inside your WordPress editor dashboard, choose a free theme to build your website upon, and start populating it with quality content!
Start off with some of the essential pages like your ‘About’ page, Privacy Policy and other legal pages.
The thing is, do not hold off publishing content while you make things perfect. For the first couple of months, very few people will see your website anyway (unless you send traffic via social media or other means).
Whatever posts you write, just get them published, you can always edit them later to perfection. Get the posts out there so the search engines will index them, and you will see better rankings in time to come.
No matter what your niche is, always aim to provide the most value that you possibly can, through your blog. Put your audience first, and help them out wherever possible.
High quality content establishes your authority in the niche, and earns you the trust of not just your audience, but also the search engines. Content marketing is key to building up an online business.
As you see initial success in the months ahead and start making money, you may want to consider some of these extras:
– theme upgrades and page builders can make your website look nicer
– some plugins for certain key functions
– email autoresponder helps you capture your readers’ contacts, so you can nurture a relationship with them
– keyword research tool provides in-depth analysis of your chosen keywords and its competition
– social media tools (like Tailwind) allows time-saving automation
For now, blog away, and enjoy it!
Once you get your website set up, comment below to tell me about it! I’d like to congratulate you and welcome you to the world of blogging. 🙂
This is some excellent information on how to get started making money online. Do you need experience or training to do this? How did you learn your skills?
Hi Catherine,
I did this from scratch, without a single bit of knowledge about setting up my own website. So I know anyone can do this too.
Check out my #1 recommendation, that is where I learnt everything about blogging, and how to monetize it.
It even provides all the tools I needed – website builder, hosting, domain registrar, keyword research tool, tons of training, and an entire community of like-minded solopreneurs who are constantly supporting and building up one another.
On your own, you can do it too, it’s just that it will be a much longer learning curve, since you’d have to extract the relevant information from the chaos that’s the internet, and be able to decipher the good resources from the bad.
I hope this helps. Feel free to let me know if there’s anything else I can do for you.